


Title: The Art of Crafting: Making Exquisite Silicone Mold Candles

Candle making is a timeless craft that has seen a resurgence in recent years, and for a good reason. It's a delightful blend of artistry and science, allowing you to create not just candles but also stunning pieces of decor. In this article, we'll explore the world of crafting exquisite candles using silicone molds, from choosing the right molds to mastering the techniques that make your creations truly exceptional.
Choosing the Perfect Silicone Molds
When embarking on your candle-making journey, selecting the right silicone molds is paramount. Here are some considerations to keep in mind:

1. Shape and Size: Silicone molds come in an array of shapes and sizes, from classic pillars and spheres to intricate figurines and abstract designs. Choose molds that resonate with your artistic vision.
2. Material: Opt for high-quality, food-grade silicone molds designed specifically for candle making. They are heat-resistant and provide a smooth finish to your candles.
3. Complexity: Consider your skill level. If you're a beginner, start with simpler shapes and gradually move on to more intricate designs as you gain confidence.
4. Quantity: Determine how many candles you want to make at a time. Silicone molds are available in single-cavity and multi-cavity options to suit your production needs.
Mastering the Candle-Making Process
Now that you've chosen your silicone molds, let's dive into the candle-making process to create candles that not only illuminate but also enchant:
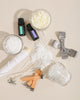
1. Gather Your Materials
Before you begin, assemble your materials:


Fragrance: High-quality candle fragrance oils for a delightful scent.
Dye: Candle dyes or color chips to add a pop of color.
Wick: Pre-tabbed wicks that fit your chosen mold.
Double Boiler: For safe and even wax melting.
Thermometer: To monitor wax temperature.
Stirring Tools: Wooden sticks or spoons for mixing.
Release Spray: To ensure easy demolding from the silicone molds.
2. Prepare Your Workspace
Set up a clean, well-ventilated workspace with ample room to work comfortably. Cover surfaces with newspaper or disposable cloths to catch any spills.
3. Melt the Wax
Using a double boiler, melt your chosen wax to the recommended temperature for your wax type. Stir gently and avoid overheating, as this can affect the quality of your candles.
4. Add Color and Fragrance
Once your wax is melted, add the desired amount of candle dye and fragrance oil. Stir thoroughly to evenly distribute color and scent throughout the wax.
5. Wick Your Molds
Attach wicks to the bottom of your silicone molds using a small amount of melted wax as adhesive. Ensure they are centered and upright to guarantee an even burn.
6. Pour the Wax


7. Allow to Set
Let your candles cool and solidify in the molds. The cooling time varies based on the size and complexity of your candles; typically, it takes a few hours.
8. Demold Your Creations


9. Trim and Clean
Trim the wicks to a suitable length and clean any excess wax from your candles using a sharp knife or a wick trimmer.
10. Display Your Artistry
Your beautifully crafted candles are now ready to adorn your space or make thoughtful gifts for loved ones. Place them in decorative holders or on elegant candle trays to showcase your artistry.

